

Do you battle for space on your Windows 11 computer? Are you searching for how to clear cache in Windows 11? Then you have come to the right platform. As a PC user, it is needless to emphasize that to improve your PC’s performance; you need to keep it clean by frequently clearing up caches.
In the meantime, there are different types of caches that you can find on Windows 11. They are not just present on your PC; they also occupy space. So, it prevents you from downloading or installing important files.
Whenever you are experiencing storage problems, clearing caches is usually advised. Moreover, having too many caches is not good for your windows. So a little spring cleaning is harmless. Therefore, clearing these caches is a good idea.
What Are Caches?
Caches are temporary files that websites and programs make to provide a quicker performance and be more productive. They are stored in hidden places. Caches also occupy space in your storage.
However, too many caches are not good for Windows 11, and clearing them will be an excellent choice. Plus, corrupted files can also be hidden in your cache and cause an app to malfunction.
Why Should I Clear Cache from My Windows 11?
Caches are inaccessible files on your computer. However, you can still clear these files when you decide to do so. Plus, clearing caches helps you clear up your storage and gives you more space for files, and other important things.
When you clear cache on your Windows 11 computer, it boosts and improves your computer’s performance and search speed. Plus, old cache files can prevent you from accessing the newest versions of websites and apps on your PC.
Is Clearing Cache Safe?
Yes, clearing caches on your system is 100% safe. Besides, the apps and websites that you visit will re-cache the data on your system. In addition, it is not an indefinite solution if you are making plans to go to these websites again.
How to Clear Cache in Windows 11
There are different ways that you can clear cache in Windows 11. So, in this section, I will be providing you with steps on how you can get rid of caches on your Windows 11. Therefore, by doing this, your PC can be fast, and its performance is out of this world. Some of the best ways to clear the cache on your windows include:
From Your Windows 11 Settings
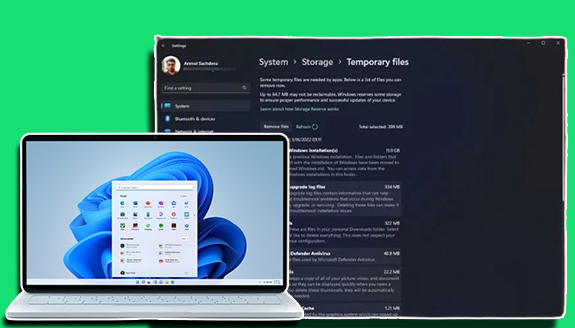
This is how to clear your Windows caches from your settings. Do not be afraid, because it is very easy to do.
- Click “Win+I” together. Note that this is a shortcut.
- Next, tap on System.
- Then, Storage.
- You will need to click on Temporary Files.
- Give your PC time to process all of your files.
- Next, you will be able to see all of your cache files that are available on your computer.
- Undo the Downloads option.
- Tap on “Remove files.”
After you have clicked on this option, all the cache files will be deleted and gotten rid of automatically.
How to Clear App Cache in Windows 11
Apps also contain caches when you download them to Windows 11. So, to clear these caches, you can do the following:
- Use the shortcut key Win + R.
- Enter in %tmp%.
- Click Enter.
- Once you click on it, choose everything and get rid of them by deleting it.
After doing this, you will be able to clear all your app caches. However, you will be unable to delete some files. This is because they are used by some of the apps that make use of them.
Using Disk Cleanup
To do this:
- Press Win + R.
- Enter cleanmgr.
- Tap Enter.
- Next, you will find a pop-up window. You will need to choose a drive.
- Choose the “C” drive option.
- Tap on OK.
- On the next page, tap “Clean up system files.”
- But if you come across the same pop-up message, click on Ok and tap on Enter.
Scroll to the bottom and choose all the cache files, which include thumbnails, temporary files, and many more. Moreover, you can also get rid of the cache files from Windows updates. Lastly, tap on Ok.
How to Flush DNS Cache In Windows 11
Windows 11 keeps the DNS cache to restore domain names from IP addresses. So, if you try opening a website and can’t, why not clear the DNS cache?
- Click on the Windows key.
- Next, type Command prompt.
- Then, tap on “Run as administrator.”
Perform or carry out the command you see to get rid of the DNS cache on your computer. Once done, restart your PC or computer.
How to Get Rid Of Microsoft Store Cache In Windows 11
To remove or flush the cache in your Microsoft Store, follow this process:
- Press the Win + R keys.
- Type in “reset” and tap Enter.
Once you perform this action, the cache in your Microsoft Store will be instantly and automatically removed.