

How to Screenshot on Mac – When you take a screenshot on your Mac, the image gets saved on your desktop by default. However, as time goes on, if you’re not doing any cleanup, your desktop eventually gets cluttered by these images. Meanwhile, a screenshot is nothing more than a simple picture of your screen, and they’re really easy to make.
On the other hand, Mac’s default tool for capturing screenshots is called Screenshot, and you can capture both images and videos of what’s on your screen. To get to the screenshot tool, you can go into your application folder, go into other, or click screenshot.
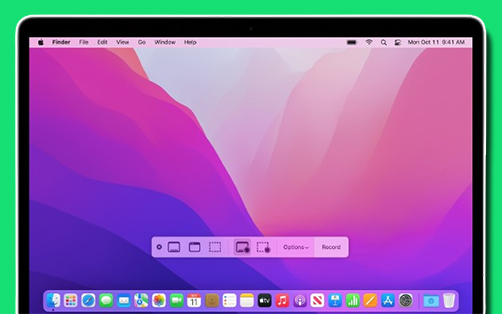
Beyond that, there’s even more that you can do. So, if you open up the screenshot tool, a bar will appear at the bottom of the screen, and you can see the different options you have available so you can capture the entire screen and everything on your screen in a specific window, which will capture it as a transparent PNG.
So, you have your window as well as a clear background, and it has transparency to it, so there’s nothing going on behind it except for a little bit of drop shadow. Then you have the selected area; this gives you a marquee tool so you can select just a small bit or a large area, whatever you want on your screen.
How to Take a Screenshot on Your Mac
Opening a tool is great, but there’s another option that’s even quicker and doesn’t involve you having to open the screenshot utility at all. You can just use a system-wide keyboard shortcut. Hit these anywhere and you’ll perform that action. First, if you want to take a screenshot of the entire screen, here are 3 methods on how to do that.
Method1:
To start, hold down three keys.
- Hold down on Shift+command+3.
So, press them all at the same time. After going through this, it’s going to appear in the bottom right, and by default, it will be saved to your desktop. From here, you can double-click on it, and it brings you right there.
Method2:
Now if you only want to capture part of your screen, all you need to do is:
- Hold shift+command+4.
The cursor will change. Drag by using a mouse pad for a certain portion and then let go. And again, it’s there in the bottom right and saves to the desktop.
Method3:
So if you want more control over your screenshot, then what you need to do is:
- Press shift+command+5.
So from here, we now have this new window in the middle, and you can release it. It also has some other options, so just use your finger to drag across and press Capture in the bottom right.
How to Crop a Screenshot on Mac
Need to crop what’s on your screen? I’ll be showing you two ways to crop a screenshot on your Mac.
- Take a screenshot by pressing command+shift.
- Press the number 4 button on your keyboard.
- You’ll see that your mouse will turn into a selection-type arrow, so click and drag to select an area. And now you’ll see a screenshot in the bottom right corner. You can click on that one, and it will open up.
- At the top of your screen, you’ll see an option. Click on the last option, which is the crop option.
- Select the area you want and crop the photo.
- Click on done once you’re done. And at the right corner of your screen, you can save it to your document or wherever your location is, or save it to your desktop so it will appear as a screenshot.
Second Method
- Once you have saved the screenshot to the desired location,
- Go to that location or go to your screenshot folder and open up the screenshot.
- Once you’ve opened it, click on the pen icon, and it will open up some editing options.
- You will see the mouse arrow; it looks like a selection kind, and what you can simply do is drag it and select an area.
Once you’ve selected at the top, you’ll see that a crop option is coming. So, you need to click on the crop option. So, once you’re done, it is saved automatically, and you don’t need to do anything. You can close it, and you’ll see the card pick is here.
How to Paste Mac Screenshots to Clipboard
Many of you know how to take a screenshot on Mac by holding the Shift key and then holding the Command key and pressing 4, which gives you the crosshairs. And if you click and drag on any area of the screen and then release, it will create a PNG file and save it, to your desktop.
But that’s all you can do with screenshots; you can also copy them to the clipboard, which is handy in a situation like this where you’ve got a PDF and you want to take screenshots out of the PDF and stick them into Photoshop just for some quick image grabbing. So, in order to do that with the previous screenshot method,
- You’ll have to create your crosshairs.
- Click on drag. Grab that; it goes to your desktop.
- Drag that into your Photoshop, and there it is.
To do the Clipboard screenshot it’s the same thing:
- You hold down the Shift command, but,
- You also hold control, and then you press 4.
- Then you can see that this is the same crosshair.
And this time you’ll see that no extra image has been added to your desktop, but it’s been copied to your clipboard.